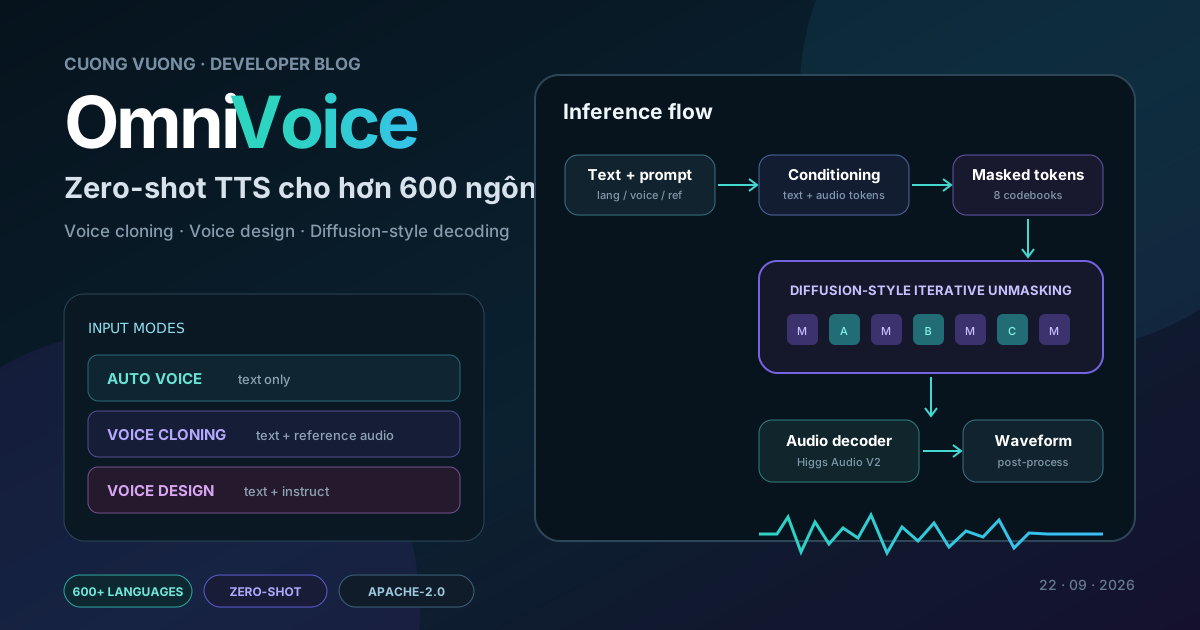
OmniVoice của nhóm k2-fsa gây chú ý trước hết ở độ phủ: cùng một model được giới thiệu là có thể tổng hợp giọng nói cho hơn 600 ngôn ngữ, đồng thời hỗ trợ clone giọng từ audio tham chiếu và tạo giọng theo mô tả.
README chia cách sử dụng thành ba mode chính:
- Voice Cloning — bắt chước giọng từ một đoạn audio tham chiếu ngắn.
- Voice Design — mô tả giọng muốn tạo bằng thuộc tính như giới tính, tuổi, pitch, accent hoặc dialect.
- Auto Voice — chỉ đưa text, để model tự chọn giọng.
Bên dưới API, tác giả mô tả kiến trúc là diffusion language model-style: model bắt đầu từ các audio token bị mask rồi mở dần chúng qua nhiều bước, thay vì sinh tuần tự từng token theo kiểu autoregressive.
Tại thời điểm tôi đọc repo cho bài viết này, package đang ở phiên bản 0.2.1, yêu cầu Python >= 3.10, source code dùng giấy phép Apache-2.0.
Repository: github.com/k2-fsa/OmniVoice
OmniVoice có gì đáng chú ý?
README hiện liệt kê các điểm chính:
- hơn 600 ngôn ngữ,
- zero-shot voice cloning,
- voice design,
- non-verbal control như
[laughter], - pronunciation control bằng pinyin hoặc phoneme,
- long-form generation,
- batch inference nhiều GPU,
- optional FlashInfer acceleration,
- training, fine-tuning và LoRA fine-tuning.
API inference được giữ khá gọn. Dù dùng cloning, design hay auto voice, entry point vẫn là:
model.generate(...)
Mode được quyết định chủ yếu bởi những tham số bạn truyền vào:
text + ref_audio      → Voice Cloning
text + instruct       → Voice Design
text only             → Auto Voice
Nhờ vậy, có thể thử model ở mức ứng dụng trước rồi mới cần đọc sâu phần training.
Cấu trúc repository
Repository tách riêng phần inference, data, training và evaluation:
OmniVoice/
├── omnivoice/
│   ├── cli/
│   ├── data/
│   ├── eval/
│   ├── models/
│   ├── scripts/
│   ├── training/
│   └── utils/
├── examples/
├── docs/
├── tests/
├── pyproject.toml
└── README.md
Phần quan trọng nhất cho inference là:
omnivoice/models/omnivoice.py
File này chứa:
OmniVoice,OmniVoiceConfig,OmniVoiceGenerationConfig,VoiceClonePrompt,- inference pipeline,
- audio token encode/decode,
- long-form chunking,
- iterative masked decoding.
CLI được expose qua pyproject.toml:
omnivoice-demo
omnivoice-infer
omnivoice-infer-batch
omnivoice-merge-lora
OmniVoice xử lý một request TTS như thế nào?
Bỏ qua chi tiết tensor, pipeline inference có thể rút gọn như sau:
                 ┌─────────────────────┐
Text ───────────►│ text preprocessing  │
                 └──────────┬──────────┘
                            │
Reference audio ───────┐    │
                       ▼    ▼
                 ┌─────────────────────┐
                 │ prompt preparation  │
                 │ language / instruct │
                 │ reference tokens    │
                 └──────────┬──────────┘
                            │
                            ▼
                 ┌─────────────────────┐
                 │ masked audio tokens │
                 └──────────┬──────────┘
                            │
                            ▼
                 ┌─────────────────────┐
                 │ iterative unmasking │
                 │ diffusion-style     │
                 └──────────┬──────────┘
                            │
                            ▼
                 ┌─────────────────────┐
                 │ audio tokenizer     │
                 │ decode tokens       │
                 └──────────┬──────────┘
                            │
                            ▼
                 ┌─────────────────────┐
                 │ post processing     │
                 │ silence/fade/volume │
                 └──────────┬──────────┘
                            │
                            ▼
                         waveform
Các bước bên dưới bám theo implementation trong omnivoice/models/omnivoice.py.
1. Load model, text tokenizer và audio tokenizer
Khi gọi:
OmniVoice.from_pretrained("k2-fsa/OmniVoice")
OmniVoice không chỉ load trọng số model; nó còn chuẩn bị các thành phần dùng cho inference. Gồm:
OmniVoice model
    +
text tokenizer
    +
audio tokenizer
    +
duration estimator
Audio tokenizer dùng Higgs Audio V2 tokenizer. Trong code, nếu checkpoint local/model snapshot không có thư mục audio_tokenizer, OmniVoice fallback sang:
eustlb/higgs-audio-v2-tokenizer
Audio tokenizer có hai vai trò:
waveform
   ↓ encode
discrete audio tokens
và chiều ngược lại:
generated audio tokens
   ↓ decode
waveform
Model chính không dự đoán trực tiếp từng sample PCM. Thay vào đó, nó làm việc với discrete audio token.
2. Chọn mode generation
generate() hỗ trợ ba mode.
Voice Cloning
Bạn cung cấp:
text
ref_audio
ref_text
hoặc một VoiceClonePrompt đã encode từ trước.
Voice Design
Bạn cung cấp:
text
instruct
Ví dụ:
female, young adult, high pitch, british accent
Auto Voice
Chỉ cần:
text
Không có reference audio và cũng không có instruct.
3. Voice cloning: reference audio được biến thành prompt như thế nào?
create_voice_clone_prompt() cho thấy khá rõ reference audio được xử lý như thế nào:
ref.wav
  ↓
load / resample
  ↓
measure RMS
  ↓
optional silence removal
  ↓
optional trim
  ↓
ASR nếu ref_text bị thiếu
  ↓
audio tokenizer.encode()
  ↓
reference audio tokens
  ↓
VoiceClonePrompt
Preprocessing reference audio
OmniVoice có thể:
- resample về sampling rate mà audio tokenizer cần,
- chuyển multi-channel về mono,
- remove silence,
- normalize mức âm lượng,
- trim reference quá dài.
README khuyến nghị reference clip khoảng:
3–10 giây
Reference dài hơn có thể làm inference chậm hơn, tốn memory hơn và thậm chí giảm chất lượng clone.
Không có transcript thì sao?
Nếu bạn không truyền ref_text, OmniVoice có thể dùng Whisper ASR để tự transcribe reference audio. Default ASR model trong code là:
openai/whisper-large-v3-turbo
ASR chỉ được load khi cần hoặc khi bạn chủ động yêu cầu. Đổi lại, lần đầu dùng auto-transcription sẽ phải tải thêm model ASR và tốn thêm memory.
Reference được encode thành discrete token
Sau preprocessing:
ref_audio_tokens = self.audio_tokenizer.encode(...)
Kết quả được lưu cùng:
- transcript,
- RMS volume,
- audio tokens.
Đó chính là VoiceClonePrompt.
4. Có thể cache giọng clone để tái sử dụng
Nếu một giọng được dùng nhiều lần, reference audio chỉ cần encode một lần.
prompt = model.create_voice_clone_prompt(
    ref_audio="ref.wav",
    ref_text="Reference transcript."
)

prompt.save("my_voice.pt")
Session sau:
from omnivoice import VoiceClonePrompt

prompt = VoiceClonePrompt.load("my_voice.pt")

audio = model.generate(
    text="Hello again.",
    voice_clone_prompt=prompt,
)
Flow lúc này:
ref.wav
   ↓ một lần
VoiceClonePrompt
   ↓ save
my_voice.pt
   ↓ reuse nhiều lần
generation
Với ứng dụng có một tập giọng cố định, lưu prompt sẵn sẽ hợp lý hơn việc encode lại reference audio ở từng request.
5. Text, language và voice instruction được đóng gói thành conditioning
Trước khi model sinh audio token, OmniVoice build các token conditioning. Trong code có các nhóm special token như:
<|denoise|>

<|lang_start|>
...
<|lang_end|>

<|instruct_start|>
...
<|instruct_end|>

<|text_start|>
...
<|text_end|>
Sequence đưa vào model có thể hiểu đơn giản là:
style tokens
+
text tokens
+
optional reference audio tokens
+
masked target audio tokens
Target audio lúc đầu chưa có token thật. Nó được fill bằng audio_mask_id.
6. Diffusion-style iterative unmasking
Phần khác biệt nằm ở cách model điền vùng audio token còn thiếu. OmniVoice không nhất thiết phải sinh audio theo kiểu:
token 1
  ↓
token 2
  ↓
token 3
  ↓
...
Thay vào đó, output bắt đầu như một vùng token bị mask:
[MASK] [MASK] [MASK] [MASK] [MASK] ...
Sau đó model chạy nhiều step. Default hiện tại:
num_step = 32
Mỗi step sẽ dự đoán các audio token và mở dần một phần vị trí.
step 0
[M] [M] [M] [M] [M] [M]

step 1
[A] [M] [M] [B] [M] [M]

step 2
[A] [C] [M] [B] [M] [D]

...

final
[A] [C] [E] [B] [F] [D]
Trong implementation, model còn tạo cả:
conditional input
+
unconditional input
để thực hiện classifier-free guidance. Default:
guidance_scale = 2.0
Cùng với đó còn có:
- position temperature,
- class temperature,
- layer penalty,
- time-step schedule.
Cơ chế mở mask theo nhiều bước này là phần gắn với cách gọi diffusion language model-style của project.
7. OmniVoice dùng nhiều audio codebook
Config mặc định hiện có:
num_audio_codebook = 8
audio_vocab_size   = 1025
audio_mask_id      = 1024
Model có:
audio_embeddings
audio_heads
để đưa discrete audio token vào hidden space của language model và dự đoán token trở lại theo từng codebook layer. Vì vậy, pipeline thực tế không phải:
LLM → waveform
Mà gần hơn với:
text / prompt
    ↓
language-model backbone
    ↓
multi-codebook audio token prediction
    ↓
audio tokenizer decoder
    ↓
waveform
8. Duration estimator quyết định cần bao nhiêu audio token
Nếu bạn không set duration, OmniVoice dùng RuleDurationEstimator để ước lượng độ dài speech từ text. Sau đó:
estimated duration
    ↓
target token length
    ↓
number of masked audio positions
Bạn vẫn có thể override.
Tăng tốc độ nói
audio = model.generate(
    text="Hello world",
    speed=1.2,
)
Ép duration
audio = model.generate(
    text="Hello world",
    duration=5.0,
)
Nếu có cả hai:
duration > speed
tức duration được ưu tiên.
9. Long-form generation
Sinh một đoạn speech dài trong một lần thường làm VRAM tăng mạnh. OmniVoice xử lý bằng chunking. Default:
audio_chunk_threshold = 30 giây
audio_chunk_duration  = 15 giây
Nếu estimated audio dài hơn threshold:
long text
   ↓
split theo punctuation
   ↓
chunk 1
chunk 2
chunk 3
...
   ↓
generate theo chunk
   ↓
cross-fade
   ↓
final waveform
Nếu không có reference voice, output của chunk đầu còn có thể được dùng làm reference cho các chunk tiếp theo để giữ consistency tốt hơn. Cách này giúp long-form generation giữ mức VRAM gần ổn định hơn thay vì tăng theo toàn bộ độ dài text.
10. Decode token về waveform
Sau iterative decoding, output vẫn là discrete token. Audio tokenizer sẽ decode:
audio tokens
   ↓
Higgs audio tokenizer
   ↓
waveform
Nếu là long-form, các chunk waveform được cross-fade trước khi ghép. Sau đó còn có post-processing:
- remove long silence,
- restore volume theo reference RMS,
- fade in/out,
- padding đầu/cuối.
Kết quả từ generate() là một list NumPy array, với sampling rate theo audio tokenizer; README hiện dùng 24 kHz trong ví dụ.
Cài đặt OmniVoice
Có hai cách cài chính:
pip
hoặc
uv
Nên dùng environment mới để tránh xung đột giữa PyTorch, CUDA và các dependency audio.
Cách 1 — pip
Tạo virtual environment
Linux/macOS:
python -m venv .venv
source .venv/bin/activate
Windows PowerShell:
python -m venv .venv
.\.venv\Scripts\Activate.ps1
Cài PyTorch
Với NVIDIA, README hiện đưa ví dụ CUDA 12.8:
pip install torch==2.8.0+cu128 torchaudio==2.8.0+cu128 \
  --extra-index-url https://download.pytorch.org/whl/cu128
Bạn nên chọn build PyTorch đúng với driver/CUDA của máy thay vì copy version một cách máy móc.
Apple Silicon
pip install torch==2.8.0 torchaudio==2.8.0
Sau đó dùng:
device_map="mps"
Intel Arc / XPU
README cũng có support XPU:
pip install torch torchaudio \
  --index-url https://pytorch-extension.intel.com/release-whl/stable/xpu/us/
Kiểm tra:
python -c "import torch; print(torch.xpu.is_available(), torch.xpu.device_count())"
Sau đó dùng:
device_map="xpu"
Cài package OmniVoice
Stable release từ PyPI:
pip install omnivoice
Latest source từ GitHub:
pip install git+https://github.com/k2-fsa/OmniVoice.git
Hoặc development mode:
git clone https://github.com/k2-fsa/OmniVoice.git
cd OmniVoice

pip install -e .
Cách 2 — uv
git clone https://github.com/k2-fsa/OmniVoice.git
cd OmniVoice

uv sync
Repo hiện pin PyTorch/Torchaudio 2.8.0 trong phần constraint của uv và cấu hình CUDA index cho Linux/Windows.
Chạy nhanh bằng giao diện web
Sau khi cài package:
omnivoice-demo --ip 0.0.0.0 --port 8001
Sau đó mở:
http://localhost:8001
Gradio demo cho phép thử các mode mà không phải viết Python trước. README cũng cung cấp Hugging Face Space và Google Colab.
Ví dụ 1 — Auto Voice đơn giản
Nếu chỉ muốn text-to-speech và không quan tâm speaker cụ thể:
import soundfile as sf
import torch

from omnivoice import OmniVoice

model = OmniVoice.from_pretrained(
    "k2-fsa/OmniVoice",
    device_map="cuda:0",
    dtype=torch.float16,
)

audio = model.generate(
    text="Xin chào. Đây là một thử nghiệm với OmniVoice.",
    language="Vietnamese",
)

sf.write(
    "auto_voice.wav",
    audio[0],
    model.sampling_rate,
)
Flow:
Vietnamese text
    ↓
text tokenizer
    ↓
auto voice conditioning
    ↓
iterative audio token generation
    ↓
audio decoder
    ↓
auto_voice.wav
Ví dụ 2 — Voice cloning
Chỉ nên clone giọng của chính bạn hoặc giọng mà bạn có quyền/được phép sử dụng. Giả sử có file:
ref.wav
và transcript đúng với reference.
import soundfile as sf
import torch

from omnivoice import OmniVoice

model = OmniVoice.from_pretrained(
    "k2-fsa/OmniVoice",
    device_map="cuda:0",
    dtype=torch.float16,
)

audio = model.generate(
    text="Đây là câu mới được tổng hợp bằng giọng tham chiếu.",
    language="Vietnamese",
    ref_audio="ref.wav",
    ref_text="Đây là nội dung được đọc trong đoạn âm thanh tham chiếu.",
)

sf.write(
    "cloned.wav",
    audio[0],
    model.sampling_rate,
)
README khuyến nghị reference khoảng 3–10 giây.
Không muốn tự nhập transcript?
Có thể bỏ ref_text:
audio = model.generate(
    text="This is generated from my reference voice.",
    ref_audio="ref.wav",
)
OmniVoice sẽ load Whisper ASR để transcribe reference audio. Nếu dùng nhiều GPU, bạn còn có thể đặt ASR ở GPU khác:
model = OmniVoice.from_pretrained(
    "k2-fsa/OmniVoice",
    device_map="cuda:0",
    dtype=torch.float16,
    asr_device="cuda:1",
)
hoặc để ASR trên CPU:
asr_device="cpu"
Ví dụ 3 — Cache cloned voice
Nếu cùng một speaker được dùng nhiều lần:
prompt = model.create_voice_clone_prompt(
    ref_audio="ref.wav",
    ref_text="Reference transcript.",
)

prompt.save("my_voice.pt")
Sau này:
from omnivoice import VoiceClonePrompt

prompt = VoiceClonePrompt.load("my_voice.pt")

audio = model.generate(
    text="A new sentence from the same cached voice.",
    voice_clone_prompt=prompt,
)
Cách này bỏ qua việc load reference audio, silence preprocessing, ASR và audio encoding ở các lần generate sau.
Ví dụ 4 — Voice Design
Không cần reference audio.
audio = model.generate(
    text="Welcome to the OmniVoice voice design demo.",
    instruct="female, young adult, low pitch, british accent",
)
Các nhóm thuộc tính được docs liệt kê gồm:
- gender,
- age,
- pitch,
- whisper,
- English accent,
- Chinese dialect.
Ví dụ:
male, elderly, low pitch, whisper
hoặc:
female, high pitch, british accent
Giới hạn của Voice Design
README nói model chủ yếu được train cho voice cloning, nên đây là mode ổn định nhất. Voice Design được train trên dữ liệu Chinese và English. Nó có thể generalize sang ngôn ngữ khác nhưng kết quả có thể không ổn định, đặc biệt với low-resource language hoặc attribute combination hiếm.
Ví dụ 5 — Non-verbal control
Bạn có thể chèn control tag trực tiếp vào text.
audio = model.generate(
    text="[laughter] You really got me. I did not see that coming."
)
README hiện liệt kê các tag như:
[laughter]
[sigh]
[confirmation-en]
[question-en]
[surprise-ah]
[surprise-oh]
...
Các tag này hữu ích khi cần thêm tiếng cười, tiếng thở dài hoặc phản ứng ngắn thay vì chỉ đọc plain text.
Ví dụ 6 — Pronunciation control
English
Có thể dùng CMU pronunciation format:
audio = model.generate(
    text="He plays the [B EY1 S] guitar while catching a [B AE1 S] fish."
)
Hai từ “bass” được ép phát âm khác nhau.
Chinese
Repo hỗ trợ pinyin tone number inline để sửa pronunciation cho một ký tự cụ thể.
Ví dụ 7 — Text normalization
Để đọc số tự nhiên hơn:
pip install "omnivoice[tn]"
Sau đó:
audio = model.generate(
    text="I have 2345 apples.",
    normalize_text=True,
)
Chinese và English dùng WeTextProcessing. Các language khác fallback về num2words cho integer khi dependency có sẵn.
Sử dụng bằng CLI
Nếu không muốn viết Python, omnivoice-infer là cách nhanh nhất.
Voice Cloning
omnivoice-infer \
  --model k2-fsa/OmniVoice \
  --text "This is a test for text to speech." \
  --ref_audio ref.wav \
  --ref_text "Transcription of the reference audio." \
  --output hello.wav
Voice Design
omnivoice-infer \
  --model k2-fsa/OmniVoice \
  --text "This is a test for text to speech." \
  --instruct "male, British accent" \
  --output hello.wav
Auto Voice
omnivoice-infer \
  --model k2-fsa/OmniVoice \
  --text "This is a test for text to speech." \
  --output hello.wav
Batch inference nhiều GPU
Repo có:
omnivoice-infer-batch
Input là JSONL. Ví dụ:
{"id":"sample_001","text":"Hello world","ref_audio":"/data/ref.wav","ref_text":"Reference transcript","language_id":"en","speed":1.0}
Chạy:
omnivoice-infer-batch \
  --model k2-fsa/OmniVoice \
  --test_list test.jsonl \
  --res_dir results/
Chỉ id và text là bắt buộc. Các field khác dùng để chuyển mode hoặc control generation.
FlashInfer acceleration
Với NVIDIA GPU, project có optional integration FlashInfer. README hiện nói inference có thể được tăng tốc khoảng 2–2.9x trong các trường hợp benchmark của họ. Ví dụ cài cho CUDA 12.8:
pip install flashinfer-python==0.6.15.post1 \
  "flashinfer-jit-cache==0.6.15.post1+cu128" \
  --extra-index-url https://flashinfer.ai/whl/cu128/
Python API:
from omnivoice.models.omnivoice_flashinfer import apply_flashinfer

model = OmniVoice.from_pretrained(
    "k2-fsa/OmniVoice",
    device_map="cuda",
    dtype=torch.float16,
)

apply_flashinfer(model)
Batch=1 có thể dùng CUDA graph:
apply_flashinfer(
    model,
    enable_cuda_graph=True,
)
Theo benchmark trong README, trên H100, fp16, num_step=32, batch size 8 giảm Average RTF từ:
0.0298
xuống:
0.0115
tương đương khoảng 2.6x trong benchmark đó. Đây là benchmark trong đúng cấu hình trên; GPU, batch size và workload khác có thể cho kết quả khác.
Training và fine-tuning
Repository cũng chứa pipeline training và fine-tuning, không chỉ phần inference. Thư mục examples/ có flow:
training from scratch
fine-tuning
LoRA fine-tuning
evaluation
Training từ scratch với Emilia được chia ba stage:
Stage 0
verify dataset / manifests
    ↓
Stage 1
tokenize audio → WebDataset shards
    ↓
Stage 2
multi-GPU training with accelerate
Fine-tuning custom data dùng JSONL kiểu:
{"id":"sample_001","audio_path":"/data/audio/001.wav","text":"Hello world","language_id":"en"}
Repo cũng có LoRA để giảm chi phí fine-tune so với update toàn bộ model.
Một số giới hạn nên biết trước khi dùng
Voice cloning ổn định hơn voice design
README nói rõ voice cloning là mode được train chính và ổn định hơn voice design. Nếu mục tiêu của bạn là production TTS với speaker cụ thể, nên ưu tiên voice cloning trước.
Reference audio nên ngắn và sạch
Khuyến nghị:
3–10 giây
Reference quá dài có thể chậm, tốn memory và giảm chất lượng.
Cross-lingual cloning có thể mang accent của reference
Ví dụ:
reference: English
target: Vietnamese
voice identity có thể được giữ, nhưng output có thể mang accent từ language của reference. README khuyên nếu muốn pronunciation chuẩn nhất thì reference nên cùng language với target.
Clip cực ngắn có thể khó hơn
Docs ghi rằng output khoảng 1–2 giây, đặc biệt khi không có reference audio, có thể không ổn định. Nếu cần clip rất ngắn, reference audio có thể giúp.
Min Nan / Hokkien có format input riêng
Ở model version hiện tại, docs nói Min Nan Chinese chỉ support input bằng Tai-lo romanization, không phải Chinese character.
So sánh ba mode để chọn nhanh
| Mode | Input thêm | Ưu điểm | Khi nên dùng |
|---|---|---|---|
| Auto Voice | Không | đơn giản nhất | demo, prototype |
| Voice Cloning | reference audio | giữ speaker identity | app cần giọng cụ thể |
| Voice Design | instruct | không cần reference | tạo giọng theo thuộc tính |
Nếu mới thử OmniVoice, có thể đi theo thứ tự:
Auto Voice
   ↓
Voice Cloning
   ↓
Voice Design
   ↓
batch / optimization
như vậy dễ tách lỗi environment khỏi lỗi prompt/voice conditioning.
Một cách triển khai OmniVoice vào ứng dụng
Nếu đưa OmniVoice vào một ứng dụng, tôi sẽ tách request TTS khỏi phần inference theo kiểu sau:
                    ┌─────────────────┐
                    │  Web / API app  │
                    └────────┬────────┘
                             │
                             ▼
                    ┌─────────────────┐
                    │ TTS job request │
                    └────────┬────────┘
                             │
               ┌─────────────┼─────────────┐
               │             │             │
               ▼             ▼             ▼
          Auto voice      Clone voice   Voice design
                            │
                            ▼
                    cached VoiceClonePrompt
               │             │             │
               └─────────────┼─────────────┘
                             ▼
                    OmniVoice.generate()
                             │
                             ▼
                         WAV output
                             │
                             ▼
                    object storage / CDN
Với speaker dùng lặp lại, nên cache VoiceClonePrompt thay vì encode reference ở mỗi request. Nếu workload lớn, chuyển inference sang worker queue và batch theo GPU thay vì chạy trực tiếp trong HTTP request.
OmniVoice phù hợp với ai?
OmniVoice phù hợp để thử nếu bạn đang làm:
- multilingual TTS,
- audiobook / narration,
- localization,
- voice assistant,
- accessibility,
- game/character speech,
- research về diffusion-style speech generation,
- ứng dụng cần voice cloning hợp pháp,
- batch speech synthesis.
Độ phủ hơn 600 ngôn ngữ đặc biệt hữu ích với những bài toán mà các dịch vụ TTS phổ biến chỉ hỗ trợ một nhóm ngôn ngữ lớn.
Lưu ý về voice cloning và sử dụng có trách nhiệm
Voice cloning rất hữu ích, nhưng cũng là phần dễ bị lạm dụng nhất của một hệ TTS. README của OmniVoice có disclaimer rõ: không dùng model cho unauthorized voice cloning, impersonation, fraud, scams hoặc hoạt động trái pháp luật/phi đạo đức.
Nếu đưa vào sản phẩm thật, ít nhất nên có:
- quyền sử dụng voice rõ ràng,
- consent của speaker,
- access control cho voice profile,
- audit log,
- policy chống impersonation,
- quy trình xóa voice data khi được yêu cầu.
Các biện pháp kỹ thuật không thay thế được phần consent và governance.
Kết luận
Con số 600+ ngôn ngữ là điểm dễ thấy nhất, nhưng phần đáng xem hơn nằm ở cách OmniVoice gom nhiều khả năng vào cùng một API:
text
+
optional reference voice
+
optional voice instruction
    ↓
multilingual conditioning
    ↓
diffusion-style masked audio token generation
    ↓
audio tokenizer decode
    ↓
speech waveform
Ở phía developer, entry point vẫn chỉ là:
model.generate(...)
nhưng bên dưới đã có:
- audio tokenizer,
- duration estimation,
- optional ASR,
- iterative unmasking,
- classifier-free guidance,
- long-form chunking,
- cross-fade,
- batch inference,
- optional FlashInfer acceleration.
Nếu cần một project open-source để thử multilingual TTS, voice cloning hoặc tìm hiểu diffusion-style speech generation, OmniVoice là một repo đáng để đọc source và chạy thử.
Repository: https://github.com/k2-fsa/OmniVoice
Nguồn tôi dùng để phân tích
Bài viết được đọc và đối chiếu với snapshot repository k2-fsa/OmniVoice tại commit:
08be0b4ccbac3e13e374e86fbfead4b4cac343e2
ngày 22/09/2026.
- README
- Core model — omnivoice.py
- Generation parameters
- Voice Design
- Tips & Notes
- Examples: training, fine-tuning, evaluation
- Package configuration
- Apache-2.0 license

Cuong Vuong · Developer, Writer, Builder
Tôi viết về những thứ đã thử, đã xây dựng và những bài học có thể dùng lại trong dự án tiếp theo.
More about me →